Features
Language Server
The language server used for VHDLbyHGB is the
open-source RustHDL: VHDL LS.
This language server
is very powerful and gets regularly updated and
maintained by several contributors.
The language server uses the Microsoft specified Language Server Protocol (LSP)
to standardize the communication between the lanugage tool and the editor.
With this multiple platforms can work with the same language server.
The image below illustrates the dependencies:
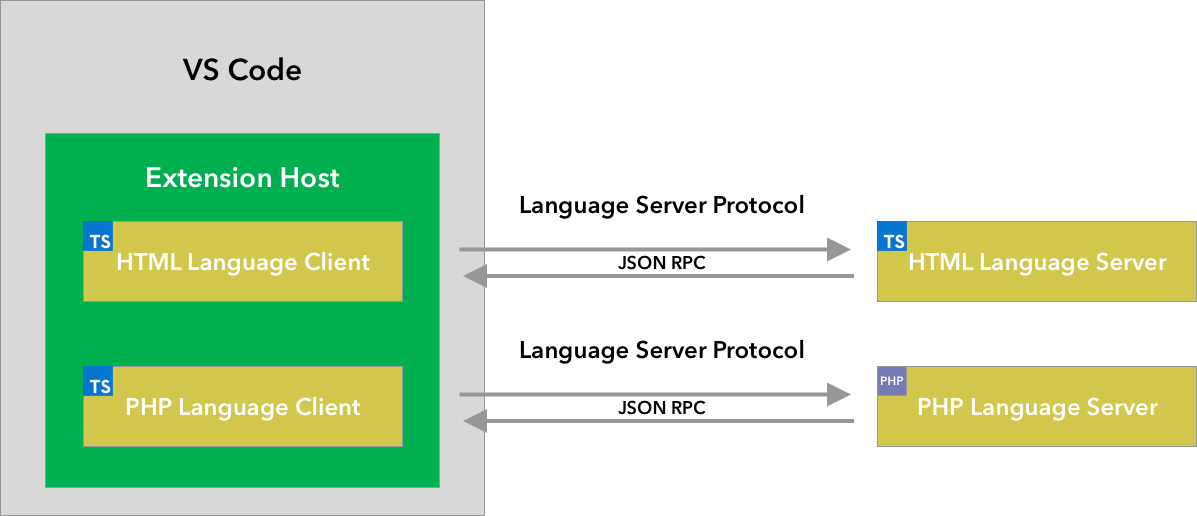
Visual Studio Code does not run the Language Server in the extension or
service itself but rather "outside". The bridge between the language server
and the extension is the LSP.
This is also illustrated below:
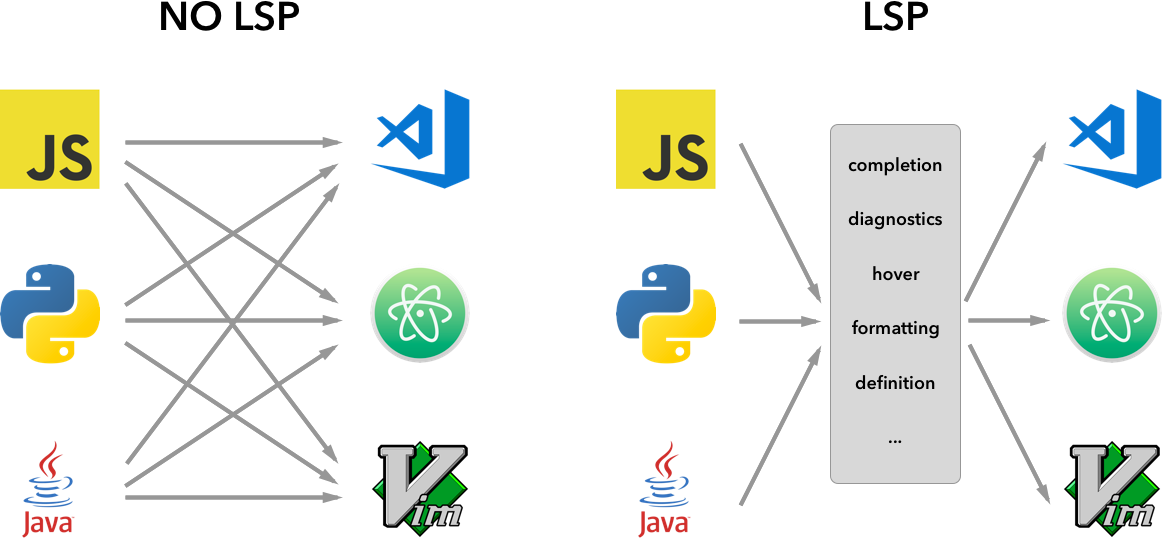
These images are from the official Visual Studio Code language server extension guide website. For more information check out the link above.
Below is a simple sequence chart visualising the communication between the extension and the language server.
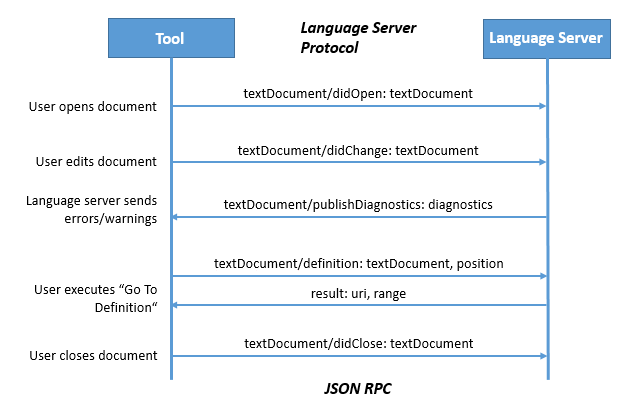
The last image is from the official Visual Studio Code language server protocol website. For more information check out the link above.
VHDL-LS
You can check out the language server with all its features, advantages, and source code here or read more about the features in the README-Markdown-File.
Some features VHDLbyHGB uses are already provided by the language server, such as live syntax and type checking, declaration checking, renaming, goto-implementation or hovering, which can be seen bellow.
TOML file
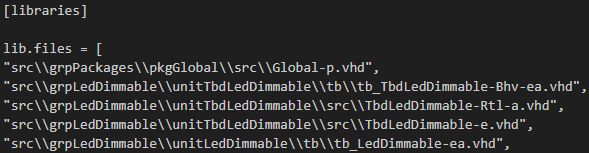
The language server needs to know the library
mapping of the VHDL files in the project, for
this purpose it reads a configuration file in
the TOML format named vhdl_ls.toml.
The file contains
the library mapping of all files within the project
and should be located in the workspace root. Files
outside of the project without library mapping are
checked for syntax errors only.
Hovering
The corresponding sample request for hovering:

Linting
Linting is used to show errors in the code and to get a kind of code analysis. This helps you write your code and find and fix sources of error. The information is taken from the language server.
Formatter
It is possible to use the built-in formatter of VHDLbyHGB to format a file by simply using the shortcut Shift + Alt + F (Windows) or Shift + Option + F (macOS).
Or via the Command Palette by using the Shortcut Ctrl + Shift + P (Windows) or CMD + Shift + P (macOS) and than type Format Document.
Under the property vhdl-by-hgb.formatter you can choose which formatter you would like to use.
Currently there are two formatter available: VHDLFormatter by g2384 and Emacs-VHDL-Mode-Formatter.
To read more about the supported Formatters, check out the README-Markdown-File.
Entity-Converter
The entity converter, as it name suggests,
copies an entity and pastes it in different formats.
This can be either done by using commands ot the
context-menu (right click in
the code segment of an VHDL entity).
You can either copy an entity, paste it as an
entity, component or instantiation or copy only
the paste constants or signals.
The following commands can be used:
> VHDLbyHGB.copyEntity
> VHDLbyHGB.pasteAsComponent
> VHDLbyHGB.pasteAsInstance
> VHDLbyHGB.pasteAsEntity
> VHDLbyHGB.pasteConstants
> VHDLbyHGB.pasteSignals
Snippets
VHDLbyHGB has different kindes of Snippets: conversion, instantiation, VUnit, Quartus, Xilinx, dynamic and general snippets.
Some examples would be for conversion snippets to_int or sign_to_int, for Quartus Simple Dual RAM, Xilinx Xilinx: BITSLICE_CONTROL. Some genereal snippets would be fall or rise and fsm. An instantiation snippet would be testbench.
Dynamic snippets depend on the written code, thus there are no examples written.
For further information and more snippets, please read the snippet or the dynamic snippet section in the README-Markdown-File.
Dynamic Snippets
VHDLbyHGB also creates entity instantiation snippets dynamically. Each entity that has been correctly described with its ports and/or generics can thus be inserted into testbenches or testbeds if the shortcut Ctrl + Alt + S (Windows/Linux) or Ctrl + Option + S (macOS) has been pressed.
This command can also be executed via Ctrl + Shift + P (Command Palette for Windows/Linux) or Cmd + Shift + P (command Palette for macOS) and typing
If entity instantiations are successfully created, a pop-up window will appear stating that new snippets have been created.
If you then want to use these snippets to create a testbench or testbed, you can simply type entity which will display all possible instantiations in the format entity <entity-name> - instantiation. Should an entity be missing, it may be due to potential significant syntax errors hindering the creation process.
Project Manager
The Project Manager of VHDLbyHGB manages the entire HDL project, from the project name and the source files to the sythesis device and simulation tests. This allows projects to be displayed easily and clearly at the toolbar on the left side in Visual Studio Code.
Projects, source files, etc. can also be added or deleted easily and quickly in the various tabs on the left-hand side.
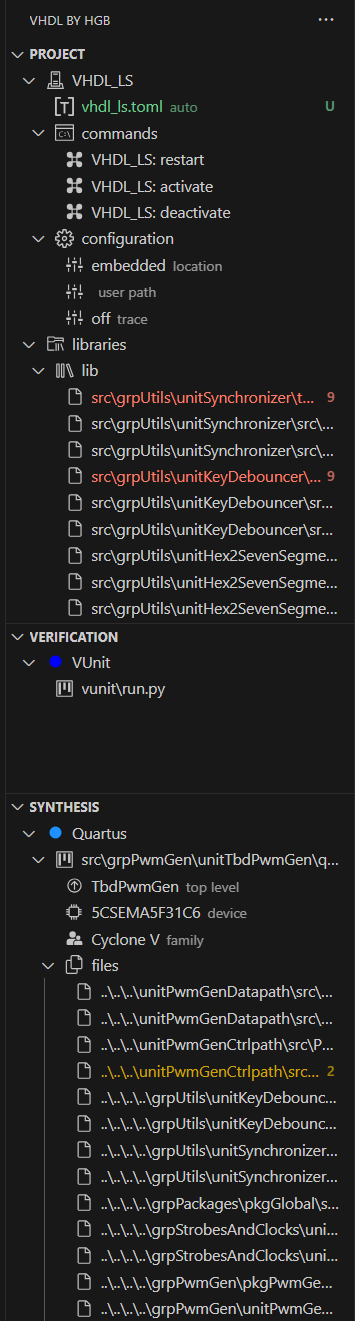
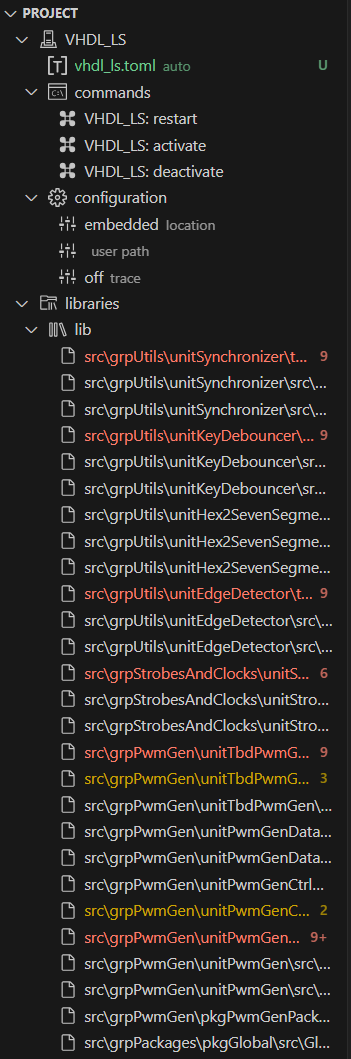
Tab Project
This tab controlls the Language Server with the TOML file as well as shortcut commands to restart, activate and deactivate the Language Server as well as some configurations.
To setup or update the project, you can use the shortcut in commands which can be found beneath VHDL_LS for the language server options.
The last tab libraries,
found under commands,
includes all used libraries in the project.
All files from a library are listed in the tabs of the respective libraries.
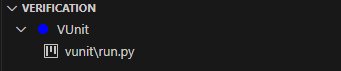
Tab Verification
Here all simulation runners, like VUnit or VHDLRegression, are
listed with their corresponding testing file.
For VUnit, as seen in the screenshot below, it is the 'run.py'
file, which allows using VUnit testbenches.
Tab Synthesis
The Synthesis tab lists all synthesis projects. In the screenshot bellow it is just the synthesisprogramm 'Quartus', as this programm needed TCL-files can be generated automatically within the Visual Studio Code Extension.
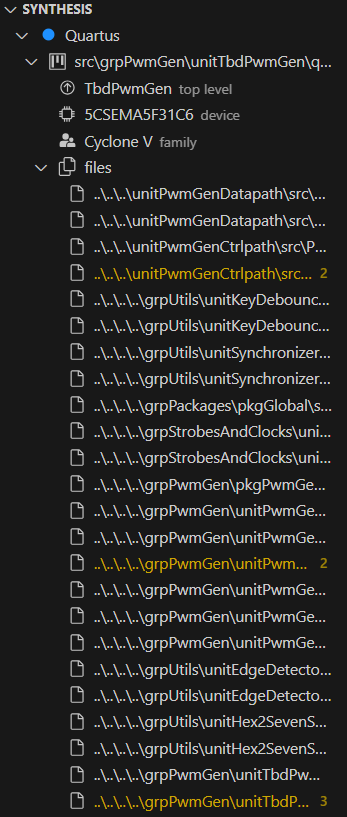
As seen in the screenshot the .qsf-file stores the information about the whole project. The top-level-entity, device and device family as well as all used files are listetd here.
You can also have more projects open in this tab and by selecting the right active synthesis project, you can switch between them and compile or test each on their own.
The general workflow of the commands would be:
- VHDLbyHGB.Synthesis.AddNewProject to create a new synthesis-project.
- VHDLbyHGB.Synthesis.SetActiveProject is needed to set an existing project as active. The commands will only be executed on the active project. Other projects will not be changed.
- VHDLbyHGB.Synthesis.SetTopLevel sets the top-level-entity for the synthesis-project.
- VHDLbyHGB.Synthesis.UpdateFiles updates the files in the synthesis-project, if the top-level-entity is set.
- VHDLbyHGB.Synthesis.Compile compiles the whole active project.
- VHDLbyHGB.Synthesis.LaunchGUI launches the GUI of the synthesis-project. The example from the screenshot launches the Quartus software with this command.
-
VHDLbyHGB.Synthesis.SetDevice
sets the device for the synthesis-project.
For example: 5CSEMA5F31C6, 5CSXFC6C6U23I7L, 5M2210ZF256C5 or EP2AGX45DF29C4. -
VHDLbyHGB.Synthesis.SetFamily
sets the device family of the synthesis board.
For exapmle: CycloneV or Arria II.
VUnit
VHDLbyHGB supports the use of VUnit. For this, there is also the extension 'VUnit by HGB', which can also be installed in Visual Studio Code. Read more here.
In case of problems, questions, or bugs, an issue can be opened, as with VHDLbyHGB.
What is VUnit
VUnit is an open-source unit testing framework for VHDL and SystemVerilog that simplifies and automates the testing of testbenches. Unit testing is an essential tool for large projects.
VUnit is created, maintained, improved, and extended by many contributors on the
VUnit GitHub repository.
VHDLbyHGB supports VUnit but is an independent Visual Studio Code extension without direct
dependency.
VHDLbyHGB can be used without VUnit, just as VUnit does not require VHDLbyHGB to be
used.
How to use it
To install and use VUnit, Python 3.6 or higher is required, and you must have a simulation tool installed that supports the VUnit Python test runner, like ModelSim or GHDL.
The complete manual for the installation procedure and requirements can be found here.
If the requirements are met, VUnit can be downloaded very easily and quickly using pip:
> pip install vunit_hdl
If you want to update the installed VUnit version, you can do this similarly:
> pip install -U vunit_hdl
However, you can also clone the Git repository:
> git clone --rescurse-submodules https://github.com/VUnit/vunit.git
After the run.py file has to be imported, which can be done like this:
> python setup.py install
HDLRegression
VHDLbyHGB supports the use of HDLRegression. For this, there is also the extension 'HDLRegression by HGB', which can be installed in Visual Studio Code. Read more here.
In case of problems, questions, or bugs, an issue can be opened, as with VHDLbyHGB.
What is HDLRegression
HDLRegression is an open-source, fully costomizable regression testing tool for HDL testbenches that simplifies and automates the testing of testbenches.
Regression testing re-runs functional and non-functional code. This mechanism ensures that previously tested software till performs after changes have been done.
HDLRegression is created, maintained, improved, and extended by many contributors on the
HDLRegression GitHub repository.
VHDLbyHGB supports VUnit but is an independent Visual Studio Code extension without direct
dependency.
VHDLbyHGB can be used without VUnit, just as VUnit does not require VHDLbyHGB to be
used.
How to use it
To install and use HDLRegression, you must have a local Python3 package running in the folder.
To run a local Python3 package, execute the following terminal code:
> python setup.py build
> python setup.py develop
The complete manual for the installation procedure and requirements can be found here.
Simulation
The simulation can be executed easily and quickly by the generated TOML or VUnit files. To simulate the design, you can use either VUnit or HDLRegression. VHDLbyHGB was tested using ModelSim for simulation during development, but other simulation programmes should work as well.
If there are any problems with other simulation programmes, open an issue on GitHub.
If you do not know what ModelSim is and want to know more, here you can find out what exactly ModelSim is and also how to install it for Windows or Linux.
ModelSim and other simulation tools are only used by VHDLbyHGB, but they are tools without direct dependencies. If bugs appear in the simulation tools, one should report them to the corresponding support. The Intel Support for ModelSim can be found hereunder.
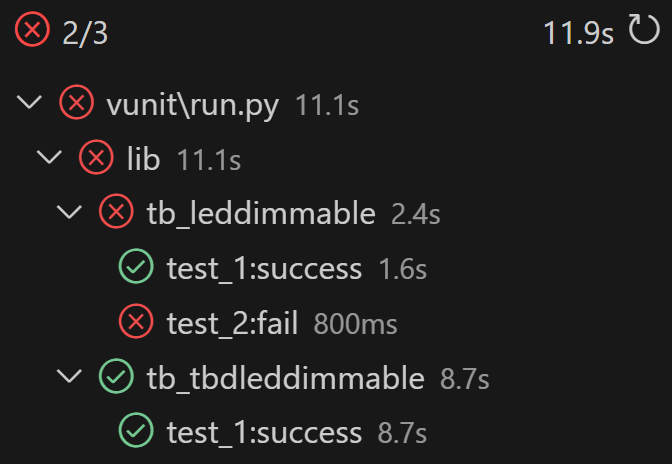
Simulation Results with VUnit by HGB
The results of the verification tests with the VUnit by HGB extension looks like this for failures and success testcases:
Synthesis
VHDLbyHGB is designed to work with the synthesis tool Quartus. All other synthesis tools are not supported yet.
To create a Quartus project or open the current project, the button in the left window can be pressed.
After that, the generated TCL scripts or those from an older synthesis state will be used for Quartus to start it. If Quartus is not installed, you can read about the different versions here or download the free 'Lite Edition' for Windows or Linux right away.
VHDLbyHGB uses Quartus, but they are two independent tools without direct dependencies. If problems appear in Quartus, one should report to Intel Support, which can be found hereunder.
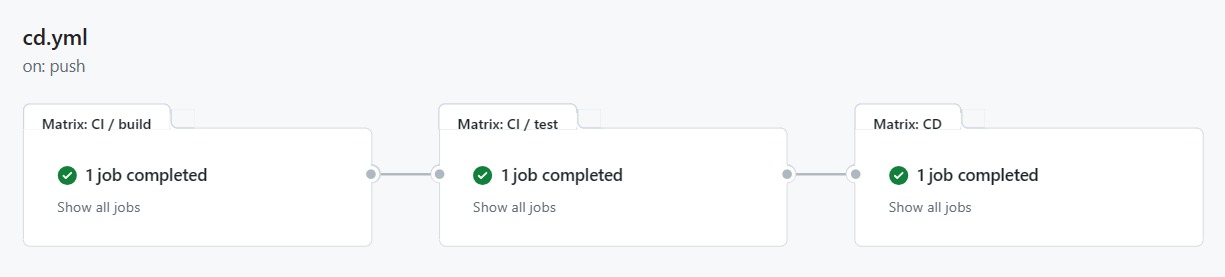
Continuous Integration / Continuous Deployment
The project supports continous integration and continous deployment. Pull-requests are checked for errors and code coverage. The extension is published in the VSCode-extension-market automatically when a version-tag is created.
The general workflow is shown below.